

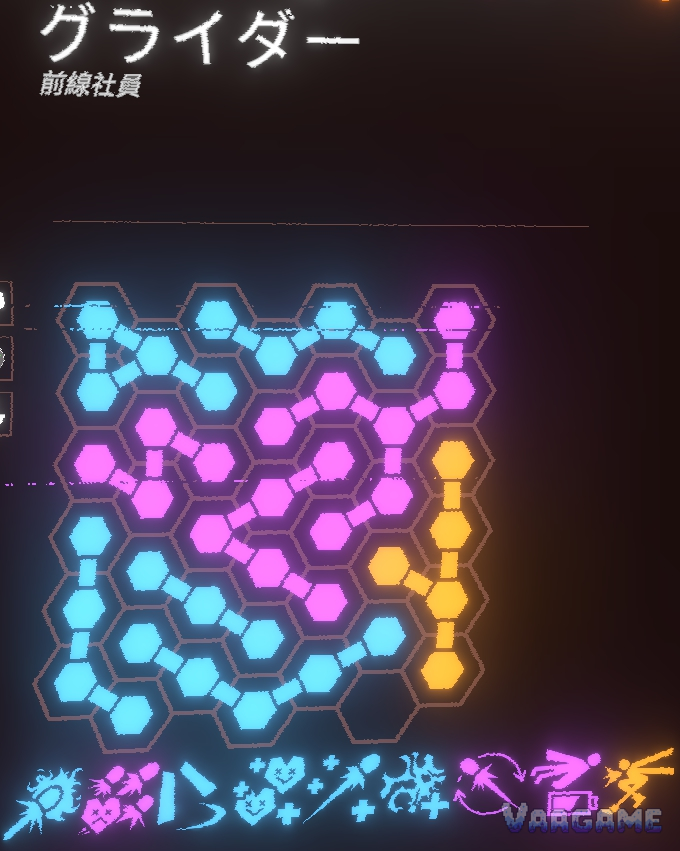
The upgrade grid is where Mycopunk builds actually happen: upgrades are shapes, not just stat boosts, and fitting them into a limited grid decides what your gun and your body can do. This guide explains the grid, the rarity unlock levels, Focus and Clearance Certificates, the 1.0 pattern-size change, and three community-sourced build directions.
At a glance
Developer: Pigeons at Play; Publisher: Devolver Digital
Full release 2026-10-20; Early Access from 2025-07-10
List price $14.99 / ¥58; current price $7.49 / ¥29 (-50%); US discount runs to 2026-11-03, China per the store page (checked 2026-10-29).
Reviews: about 4,800, about 88% Very Positive (checked 2026-10-29)
Last verified: 2026-10-29
How the grid works
Upgrades slot into a limited grid on a weapon and on the body, each in its own shape or pattern. That is the whole puzzle: a strong upgrade with an awkward shape can be worse than a weaker one that actually fits, because an upgrade that does not fit cannot be used at all. Plan the grid first, then chase the upgrade, not the other way round.
According to player community sources, the same idea applies to both sides of the build. The weapon grid shapes how a gun behaves, and the body grid shapes what the employee can do. A build is therefore two grids that have to work together, not one gun with a few bonuses bolted on.
Rarity unlock levels
According to player community sources, rarity tiers rotate in as you level up, and the unlock levels are fixed points to plan around. You cannot simply farm an Exotic upgrade at level 5 and slot it; the tier has to be unlocked first.
Swipe horizontally to view all columns.
| Rarity | Unlock level | What it means for planning |
|---|---|---|
Standard | 3 | The early grid: learn shapes before chasing tiers. |
Rare | 8 | First real tier jump; start keeping useful patterns. |
Epic | 16 | Mid-game builds start to take a clear shape. |
Exotic and above | 30 | Top tiers; long-term builds live here. |
The practical consequence is simple: do not judge an early build against a level 30 grid. Early on, the question is which shapes fit and which habits you build; the tier chase comes later, and the grid you practised with is the grid you will fill with better upgrades.
Focus and Clearance Certificates
According to player community sources, weapon Focus unlocks at level 4 from the inventory. Focus is the tool for steering drops toward one weapon instead of spreading them across everything you own.
Clearance Certificates work on the same idea, more strongly: according to player community sources, a certificate guarantees that the next 5 drops will all be for your current main weapon. Use it when you have already picked the gun you want to build, not while you are still shopping around.
The 1.0 pattern-size change
Since 1.0, most upgrade attributes scale with pattern size, according to player community sources. Shrinking an infusion upgrade makes it weaker, so the same upgrade is not the same upgrade at every size. That changes how you read old build advice: a pattern that was strong at full size may not carry the same weight shrunken down.
According to player community sources, several patterns were changed in 1.0, including Tumbleweed, Big Fat Doobie, Shock Recursion and Double Shot. If a build you copied from before 1.0 feels off, check whether one of its key patterns was among the changed ones before blaming the gun.
Space Optimization: 9 upgrades on one grid
Space Optimization asks for 9 upgrades on a single grid. That is a packing problem, not a power problem: the win comes from small patterns and clean gaps, not from one huge pattern eating the whole board. Keep small, useful upgrades instead of discarding them, and treat empty cells as the resource you are actually short of.
Three build directions with sources
The three directions below are community-mentioned strong combinations, cited from studio balance notes via player community sources. They are starting points, not a verdict on the single best build, and this guide does not crown one.
Shocklance + Micro Detonators. According to player community sources, 1.0 did not weaken this combination, but Shocklance now leans more toward small groups of targets.
Plate Launcher + Clearing Plasma. A community-mentioned pairing; build the grid around the launcher and let the plasma upgrade do the clearing work.
Lead Flinger + Big Fat Doobie + Lucky Bastard. The Lead Flinger grid shown above carries Big Fat Doobie and Lucky Bastard in its list; this is the community-mentioned trio for this revolver.
FAQ
When do higher rarities unlock?
According to player community sources: Standard at level 3, Rare at level 8, Epic at level 16, and Exotic and above at level 30.
What do Clearance Certificates do?
According to player community sources, a certificate guarantees that the next 5 drops will all be for your current main weapon.
Why did my smaller infusion feel weaker after 1.0?
Since 1.0, most upgrade attributes scale with pattern size, according to player community sources. A shrunken infusion is a weaker infusion by design, not a bug you need to work around.
Is there one best build?
This guide does not name one. The three directions above are community-mentioned combinations, and the right one depends on the gun you have actually built and the grid you can actually fill.
Related guides
Mycopunk Beginner's Guide: First Missions, Grids, Threat Levels and Your First Hours
Mycopunk Weapons Guide: Every Confirmed Gun, Grenade and What They Are For
Mycopunk Resources and Drops Guide: Loot, Focus, Certificates and Upgrades
Mycopunk 1.0 New Content Guide: Mycologist, X11-B, Weapons and What Changed